The post Outlook CRM client installation appeared first on Dynamics.
]]>Before moving forward with Microsoft dynamics CRM outlook client installation, make sure you have outlook installed and configured for access your email account.
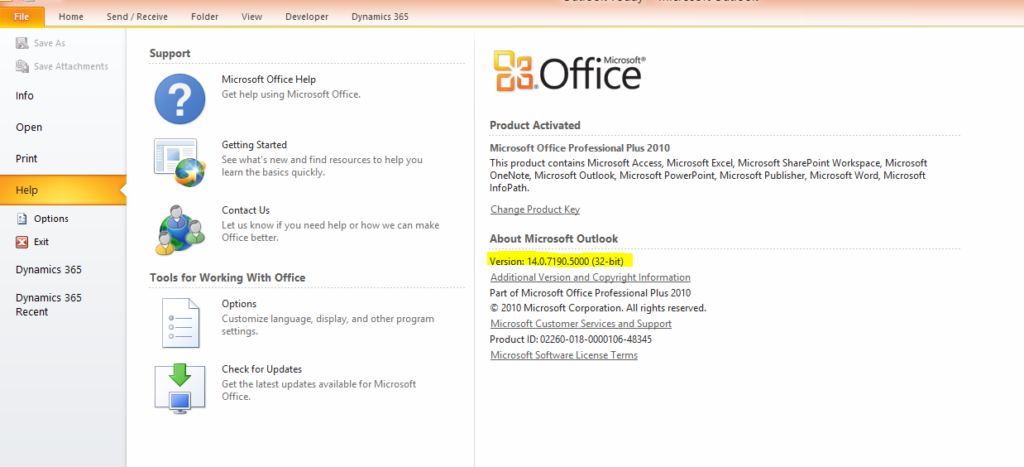
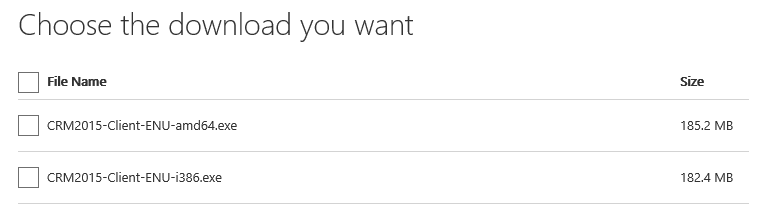
The very first step is to download Microsoft dynamics CRM outlook client and for the same open Dynamics CRM, the yellow notification appears on top for screen to download outlook client. Or you can search on google and download it from Microsoft site. Before download a version of Microsoft dynamics CRM outlook client, you must check your installed outlook version and installation type (32 bit or 64 bit and download CRM client accordingly).
Download client as per outlook version and installation type –
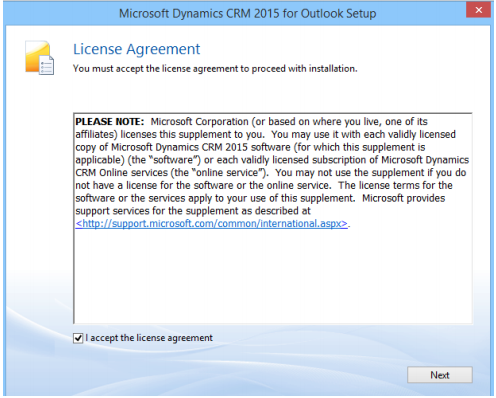
After completing download process for Microsoft Dynamics CRM Out look client installation file (like CRM20XX-ClientOnlineInstaller-ENU.exe ), double click and start installation process. Installation process checks for missing components and install those first before installing Microsoft Dynamics CRM Outlook client. When prompted select accept and click next.
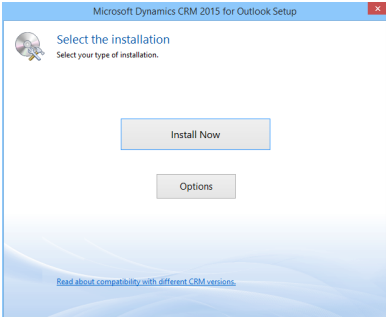
On next screen wait a minute and think do you need offline capability, if yes select options otherwise click Install Now. If you select options, check offline capability fox and then click Install Now.
Rest of install will be similar to Microsoft product installation and you will get to end to finish.
Restart system to take system in effect and then we start on configuration and we can look in next section of my blog.
The post Outlook CRM client installation appeared first on Dynamics.
]]>The post Setting Personal Options in CRM appeared first on Dynamics.
]]>
In personal Option page, there are different tabs, which will allow user to set different options:
1. General:
General tab has some basic setting like setting landing page, records per page, time zone, currency etc.
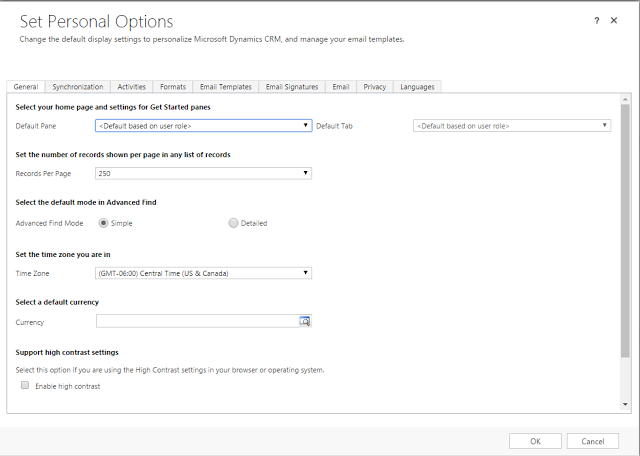
A. Select home page and settings for Get Started panes:
When user logs in CRM system, page which user will see first is the landing page. This will be set using this option. User will specify which default pane and default tab, based on selected default pane and default tab user will be landed when logged in to CRM system.

B. Set the number of records shown per page in any list of records: In CRM views / list how many records wants to see per page. Default option is 50, but user can 25, 50, 75, 100 and 250 records per page.
C. Select the default mode in advanced find: There are two different modes of advanced find- Simple and Detailed, default option selected is Simple. When user opens advanced find from any view/list, which has filters based on default mode set here, advanced find will show detailed filters.
D. Set the time zone: Time zone that user wants to display for his current region.
E. Select a default Currency: MS CRM supports multiple currencies, user can set default currency, so that when creating any records where currency is required, currency will automatically set based on selected value.
F. Support high contrast settings: User can enable high contrast, if user is using high contrast setting for browser or operating system.
G. Set the default country/ region code: Enable country/region code prefixing: Select this check box to enable the default calling code for your region. Country/Region Code Prefix: Enter the value of your region’s calling code in the text box. For example, enter +1 for the United States.
H. View your user information: Link to view details about user. This link will open CRM system user entity form to show current user details.
2. Synchronization: User can set preferences when data is synchronized between MS Dynamics CRM and Outlook or Exchange. User can view / manage online / offline filters, as well as view or manage synchronized filed. Only a system administrator can change the synchronizing fields.
3. Activities: User can set default calendar view and work hours in this tab.
4. Formats: User can set number, currency, time, date formats from this page.
The post Setting Personal Options in CRM appeared first on Dynamics.
]]>The post Setup – Email Configuration Server Side Synchronizatoin appeared first on Dynamics.
]]>Configuring Server-side Synchronization
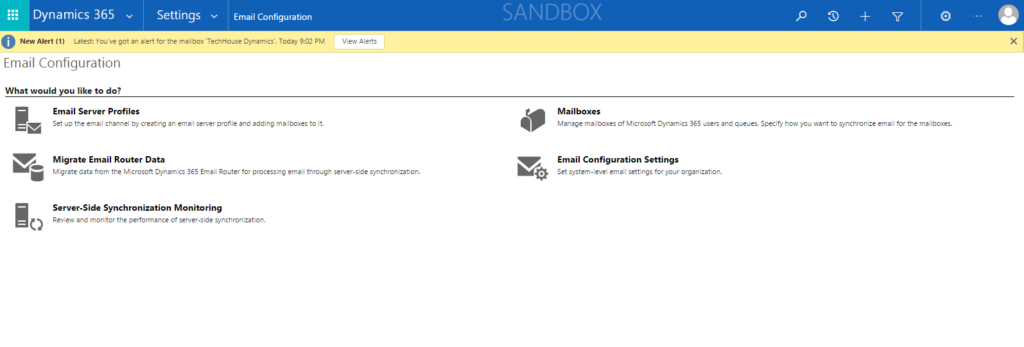
- To configure use following steps:Navigate to Settings >> Email configuration >> Select a Server Side Profiles to create a profile. Then select Email Server Profiles
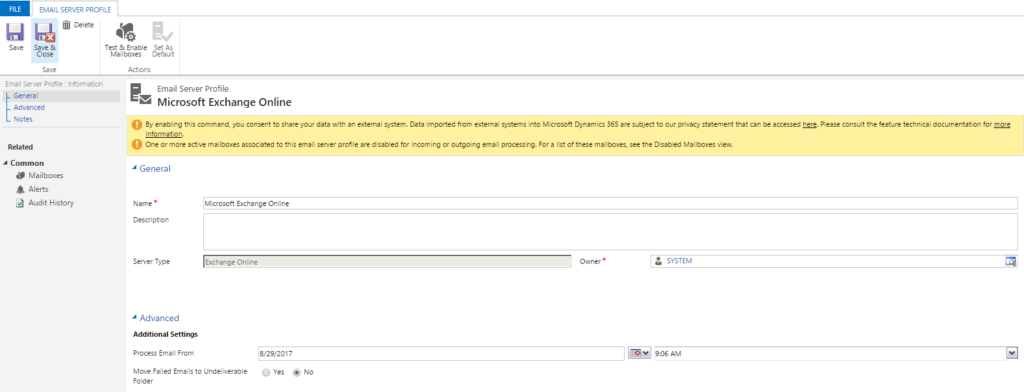
- Click New button to create new server profile and select exchange. Based on your email server you can select any of there.

- In most of case Exchange Online server is used with CRM. I selected that.
- To Activate data encryption go to Navigate >> Data Encryption and select data encryption option.
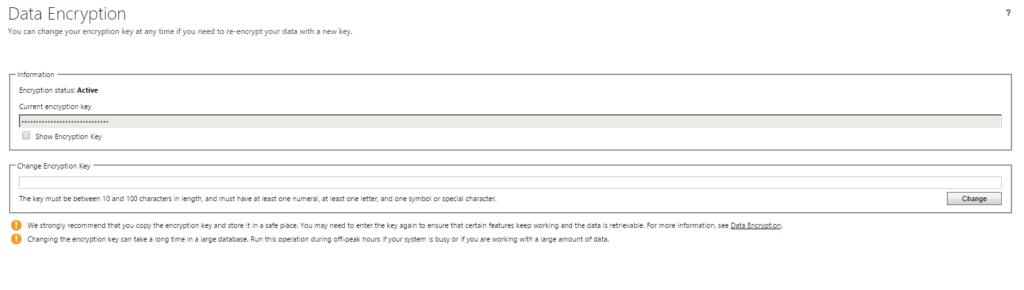
- Click Activate to enable data encryption. The new server profile page will opens, allow you to enter information for Exchange server. If you are using Dynamics CRM without any secrure socket layer. You will get error message which privent you to setup username and password. You can change authentication to integrated windows authentication or change AllowCrenditalsEntityViaNonSecureChannels in database.
- After providing input values like Name, save it. Now Test and Enable Mainlbox button appears in ribbon and it set as default.
Now it is in ready state to specify credentials for Exchange server. You can select any of these options form Authenticate option set.
- Credentials Specified by User or Queue – As per name if you want to use credentials by user or queue, select this option.
- Credentials Specified in Email server – To use credentials specified in email user, select this one. But one important point needs to care in this case is credentials must have impersonation rights on Exchange.
- Integrated Windows Authentication – This is same as CRM asynchronous service is configured with. And only applicable in case of Exchange and SMTP servers.
- Without Credentials – This is not a valid option when working with Exchange server.
Now you can setup mail box. Navigate to Mailboxes >> Active Mailboxes. By default you can see all created user in CRM system.

Select Mailbox which we need to update. By default, Incoming Emails, Outgoing Emails and Appointment, Contacts, and Tasks fields are set to Microsoft Dynamics CRM for Outlook.
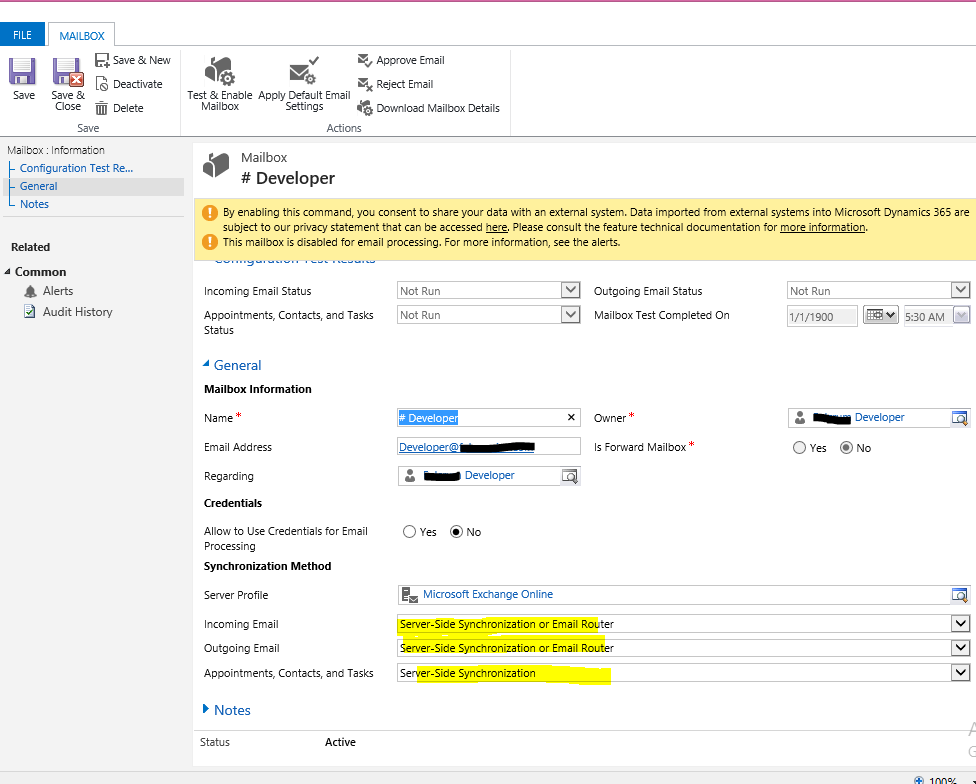
- Change settings for the Incoming Emails and Outgoing Emails, and Appointment, Contacts, Tasks fields to Service Side Synchronization or Email Router. Because you will select server side synchronization, you are prompted to specify credentials. If you select CRM for Outlook or Integrated Windows Authentication, no credentials required.
- Provide credentials and save. And click on Test and Enable mailbox for testing.
The post Setup – Email Configuration Server Side Synchronizatoin appeared first on Dynamics.
]]>The post Microsoft Dynamics 365 CRM reports appeared first on Dynamics.
]]>Creating custom reports in Dynamics CRM:
Step 1: Go to settings -> Reports.
Step 2: To create a new Report click on New.
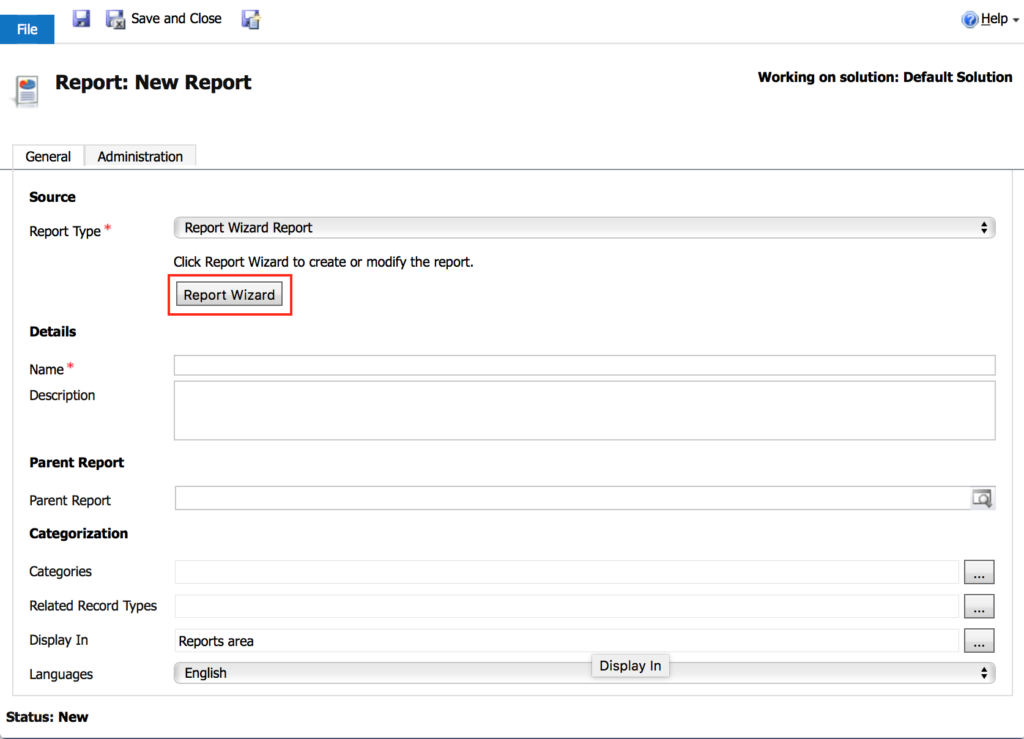
Step 3: Click on Report Wizard.
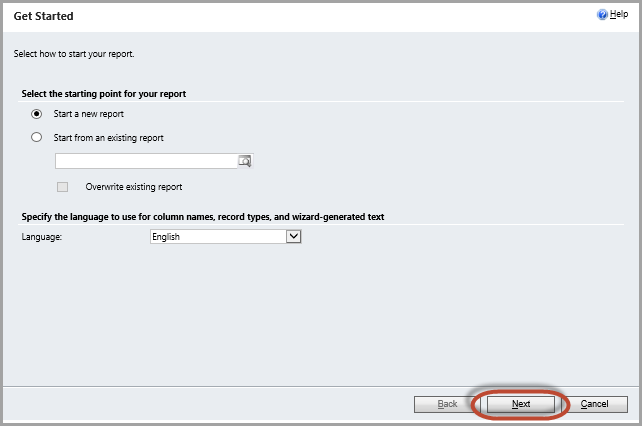
Step 4: Fill the fields and click Next.
Step 5: Report Properties wizard opens. Enter name for report and the appropriate entities to report on. Select Next.
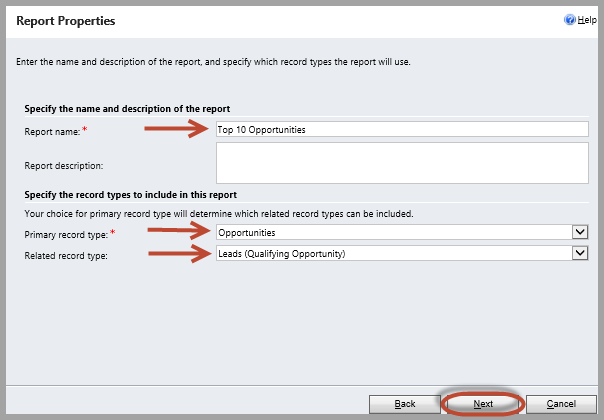
Step 5: Report Properties wizard opens. Enter name for report and the appropriate entities to report on. Select Next.

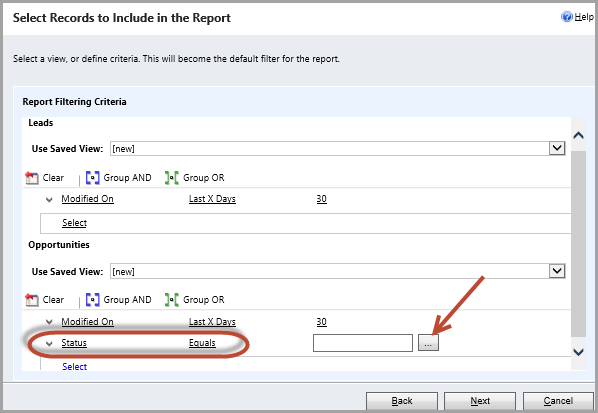
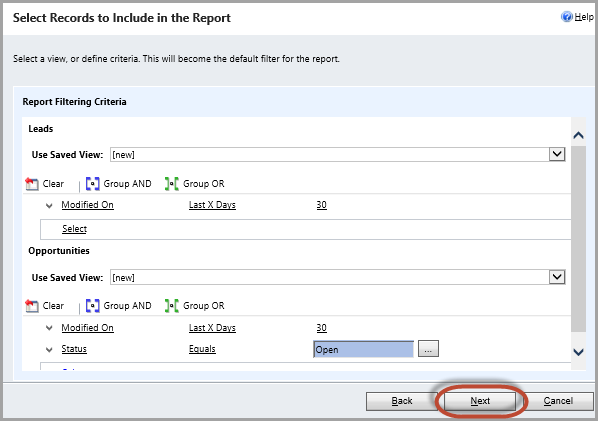
Step 6: Select filters for the data presented in the report.
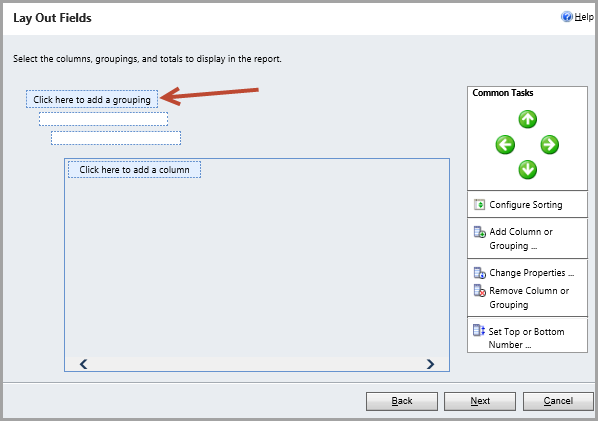
Step 7: Design the layout of report.
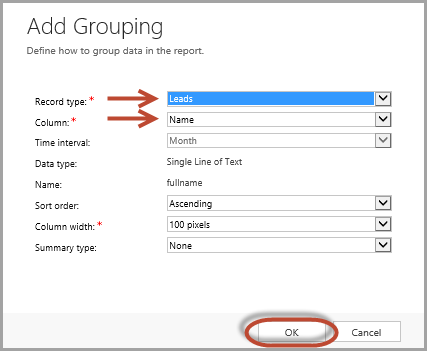
Step 8: Select the record type and the column for the data to have grouped in the report and select OK.
Step 9: Repeat step 7 for additional columns until all the data is in the report. In the Layout Fields screen, click Next.
Step 10: Choose how to format report. Choose desired format—Table only or Chart and table—and select Next.
Step 11: Review the summary of report and select Next.
Step 12: Run the report.
The post Microsoft Dynamics 365 CRM reports appeared first on Dynamics.
]]>The post CRM Analytics Charts appeared first on Dynamics.
]]>System chart:
System charts in Dynamics 365 Customer Engagement are organization-owned charts and can’t be assigned or shared.
1. Make sure the System Administrator security role or equivalent permissions in Microsoft Dynamics 365 are assigned.
2. Go to Settings > Customizations.
3. Choose Customize the System.
4. To create or edit a system chart, choose Components > Entities.
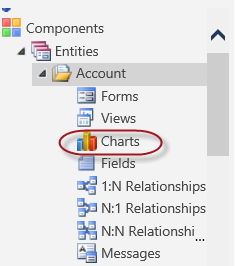
5. Expand the name of the entity, choose Charts, and then on the Actions toolbar, choose New.
OR
To edit a chart, choose More Actions, and then choose Edit.
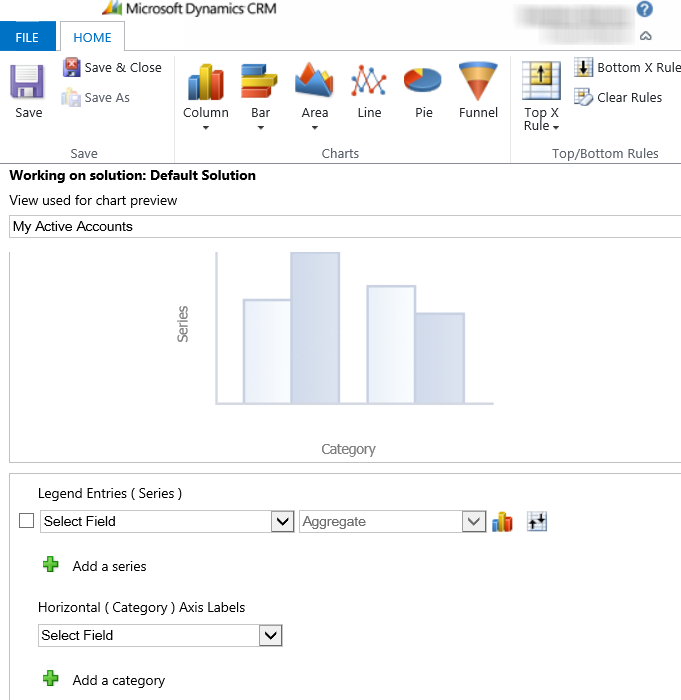
6. Select a view to use for chart preview.
7. Specify the type of chart, and how the data is displayed in the chart.
- Choose the chart name to edit it.
- Select fields for the series and category axes.
- Add a description to identify the purpose of the chart.
8. Choose Save.
User chart:
Create a chart:
1. Go to work area.
2. Open the chart designer:
3. Define the properties of the chart.
4. To specify a different name for the chart, choose the chart name to edit it.
5. To save the chart, in the chart designer, choose Save.
Specify what to display on the chart:
1. In the first drop-down box under Legend Entries (Series), select a field to display on the series axis.
2. In the Aggregate drop-down box, choose the option by which the field is to be grouped that was selected in Legend Entries (Series).
3. To create a chart with multiple series, choose the Add a series icon add_series, select another field to display on the series axis, and then select an aggregate option for that series.
4. To change the chart type for a series, select the series, choose the Current chart type icon for that series, and then select a chart type.
5. To stack items in a chart, choose the chart type, and then choose Stacked or 100% Stacked. It is possible to stack items only in a bar, column, or an area chart.
6. To display only top items on the chart, choose the Top/Bottom Rules icon > Top X Rule icon, > Top 3 or Top 5, or Custom to specify a different number.
7. From the list under Horizontal (Category), select the field to display on the category axis.
8. To create a comparison chart with multiple categories, choose the Add a category icon add_series, and then select another field to display on the category axis.
9. For fields that are of the datetime type, choose the option by which the field is to be grouped that was selected as the category.
Edit a chart:
1. Go to work area.
2. Open the chart designer:
3. Modify the properties of the chart.
The post CRM Analytics Charts appeared first on Dynamics.
]]>The post Fetch Based Report appeared first on Dynamics.
]]>Sample fetch XML to retrieve accounts –
<fetch version=”1.0″ output-format=”xml-platform” mapping=”logical” distinct=”false”>
<entity name=”account”>
<attribute name=”name”/>
<attribute name=”primarycontactid”/>
<attribute name=”telephone1″/>
<attribute name=”accountid”/>
<order attribute=”name” descending=”false”/>
</entity>
</fetch>
This is simple example but it also supports complex queries. Some of examples you can check here –
Easy and best way to create fetch example query is advance filter in dynamics CRM. Advance filter provides you visual dashboard to create and download fetch XML queries as below.

It takes you to next page where you can compose fetch query and download it.

Join fetch query example listed below to retrieve data from contact and account entities-
<fetch version=”1.0″ output-format=”xml-platform” mapping=”logical” distinct=”true”>
<entity name=”account”>
<attribute name=”name”/>
<attribute name=”primarycontactid”/>
<attribute name=”telephone1″/>
<attribute name=”accountid”/>
<order attribute=”name” descending=”false”/>
<link-entity name=”contact” from=”parentcustomerid” to=”accountid” alias=”ab”>
<filter type=”and”>
<condition attribute=”parentcustomeridname” operator=”like” value=”a%”/>
</filter>
</link-entity>
</entity>
</fetch>
Fetch Xml queries get translated into C# using fetch express and entity collection holder. To create fetch xml based reports these components required, we move forward.
- Microsoft Visual studio 2010 or 2012 (download https://www.microsoft.com/en-in/download/details.aspx?id=36020)
- Business Intelligence Development Studio or Sql server Data tool (download https://www.microsoft.com/en-in/download/details.aspx?id=36843)
- Microsoft Dynamics CRM 2016 Reporting Authoring Extension (download https://www.microsoft.com/en-us/download/details.aspx?id=50375).
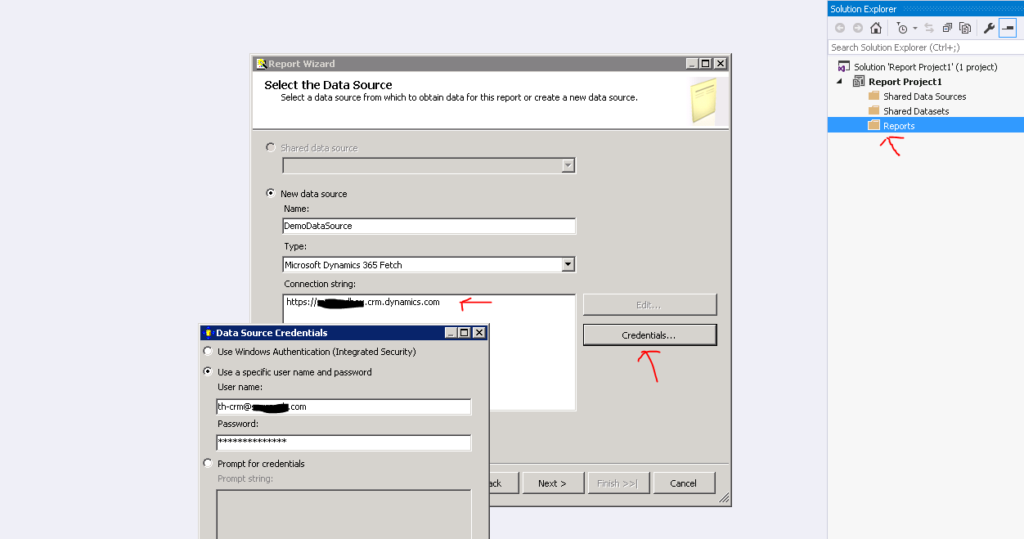
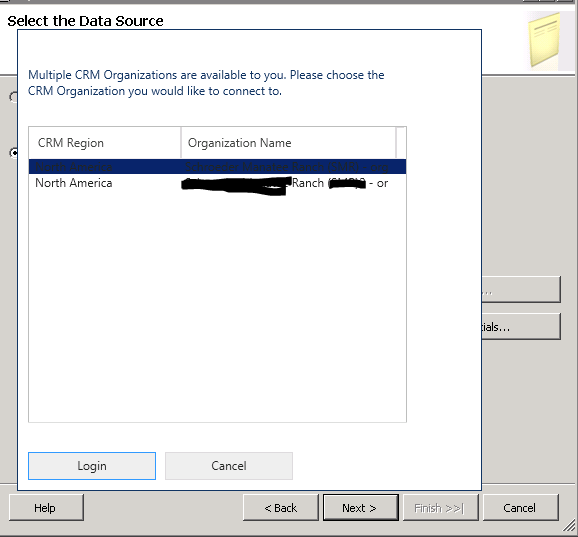
Once your development environment is ready with all these components, open visual studio and select
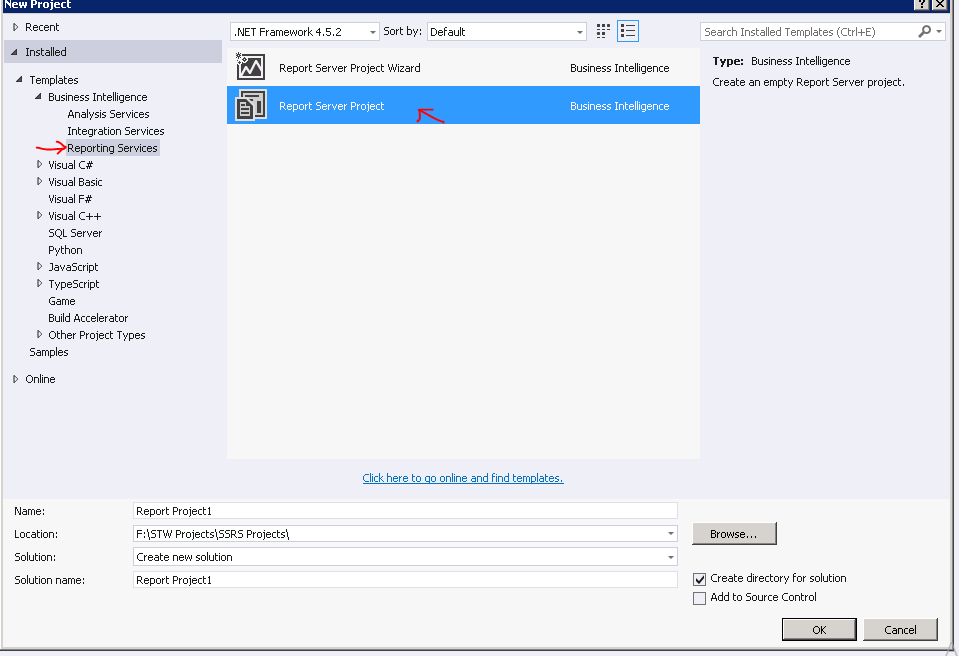
Right click on report folder and select add new report. It opens report wizard. Type new data source name and then select Microsoft Dynamics 365 Fetch in type dropdown. Put Dynamics CRM URL and provide credentials and click Next button to select organization and move next.
Wizard next step is to specify query to compose required data for report and click next.
Click Next button and create report page. Modify reports as per need and save it. You can check report preview using preview button.
To deploy created reports login in Dynamics CRM and open reports sections under Tools top navigation. Select new report and in report type use select existing file.

Once report is uploaded you can run after select report from reports list and run report.
The post Fetch Based Report appeared first on Dynamics.
]]>The post Knowledge Management appeared first on Dynamics.
]]>Dynamics 365 supports two knowledge management solutions:
A. Native Dynamics 365 knowledge management: It is available for both Dynamics 365 (online) and Dynamics 365 on-premises users. For Microsoft Dynamics 365 (online) organizations, the native Dynamics 365 knowledge solution is only available if you’ve updated to CRM Online 2016 Update. For on-premises organizations, this feature is only available if you’ve upgraded to CRM 2016.
B. Parature knowledgebase: It is available only for Dynamics 365 (online) users. This feature was introduced in CRM Online 2015 Update 1.
After knowledge management is set up, users will be able to:
- Search for relevant KB articles in Parature right from Microsoft Dynamics 365 as they’re working on a record.
- See the content of the KB article inline, including images and videos.
- Give timely and consistent information to customers when working on their cases by using actions like opening the article and sharing the information or emailing the article link to customers.
Set up knowledge management:
Step 1: Make sure that user has the System Administrator or System Customizer security role or equivalent permissions. Also the user should be the tenant administrator of Microsoft Office 365.
Step 2: Go to Settings > Service Management.
Step 3: Under Knowledge Base Management, click Embedded Knowledge Search.
Step 4: In the Knowledge Base Management Settings wizard, in Record Types, select the record types to turn on knowledge management for. The list will include all entities that are available for an N: N relationship. Knowledge management is enabled for case entity by default.
Step 5: Under Knowledge Source, in the Knowledge Solution field, select between the Dynamics 365 native knowledge solution and Parature knowledgebase.
Step 6: If user is using Native Dynamics 365 knowledge solution, in the Support Portal Connection section, enter the following:
- Use an external portal: It is possible to integrate an external portal for publishing knowledge articles. If given organization uses one, select this check box.
- URL Format: Type the portal URL that will be used to create external (public-facing) portal links for knowledge articles, which the service agents can share with the customers. The external URL is created in the following format: http://<support portal URL>/kb/ {kbnum}
The placeholder “{kbnum}” is replaced by an actual knowledge article number.
Step 7: If user is using the Parature knowledgebase, in Parature Connection Details, enter the following:
- Parature Instance: Select the Parature instance to connect to. The drop-down list by default shows the instance present in users Microsoft Office 365 subscription.
- Parature URL: This is automatically filled and shows the URL of the selected Parature instance in the tenant.
- Account ID: This is automatically filled and shows the ID of the account as it is set up in Parature for the selected Parature instance.
- Parature Department ID: Specify the department ID for the selected Parature instance. Every department in an organization can have their own knowledge base. So you must specify the ID of the department you want to connect to. It is possible to connect to only one department at a time. To find the department ID, sign in to Parature, and on the Setup tab, click System Overview.
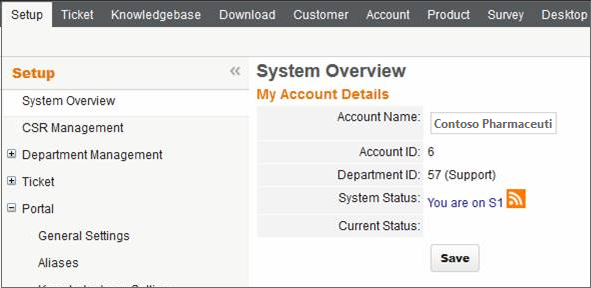
- Support Portal URL: Type the support portal URL that will be used to create external (public-facing) portal links for KB articles, which the service agents can share with the customers. Parature offers a customer-facing support portal that your customers can use to access your knowledge base articles or download content. To find the support portal URL, sign in to the Parature Service Desk, and on the Setup tab, click Portal > Aliases.
The external URL is created in the following format:
<Support Portal URL>/link/portal/<account id>/<department id>/Article/<Article id>
Step 8: Click Next.
Step 9: If details are specified correctly, the page shows the connection details for Dynamics 365 or Parature. Click Finish to complete the setup.
The post Knowledge Management appeared first on Dynamics.
]]>The post Customer Service appeared first on Dynamics.
]]>Microsoft Dynamics 365 for Customer Service is Microsoft’s customer service offering for large and enterprise-class companies. It’s one of several “Apps” in the newly branded Dynamics 365 application suite. Microsoft licenses all Dynamics 365 Apps for either cloud or on-premise deployment.

Terminologies:
- Service: A type of work, such as a maintenance activity, performed for a customer by one or more resources. Services are schedulable activities.
- Resource: Users, facilities or equipment, or teams that can be scheduled and have work schedules.
- Resource groups: Groups of resources that can be scheduled interchangeably.
- Work hours: The hours that a resource is available for scheduling.
- Site: The location of a resource. Use sites to make sure that the customer and the resource are in the same location.
- Service activity: A schedulable appointment to provide a service to a customer. A service activity uses one or more resources to perform a service at a specific time and place. An appointment is a schedulable activity that does not use services and does not require a resource with work hours.
- Scheduling rule: A set of criteria that specifies which personnel, equipment, facilities, or resource groups are required to perform a service, or how to select these resources, based on parameters like quantity and capacity.
Select resources for service:
When user adds a resource to a service, he should create a selection rule to determine how resources will be selected for service activities.
User can create a simple rule that selects resources from a list, or a compound rule that selects a combination of resources, or a complex tree of selection rules that selects from groups of equivalent resources.
Add resources to existing services:
User can add as many resources as he wants, and they can be a mix of individual users, facilities, equipment, and teams.
Use resource groups:
Resource groups are used to group users, facilities, and equipment as part of the selection rules for a service. It is possible to add resources to a resource group from the service record.
Test your service:
Before starting using a service, test it. Create a service activity with no criteria other than the service. Use the results to confirm that the service is selecting correctly. The message bar will also display any problems with the search.
- Click Dynamics 365 > Service > Service Calendar.
- Click Service Activity. This bypasses the scheduling form.
- Select the service to test.
- Click Find Available Times.
The post Customer Service appeared first on Dynamics.
]]>The post MS CRM for Sales appeared first on Dynamics.
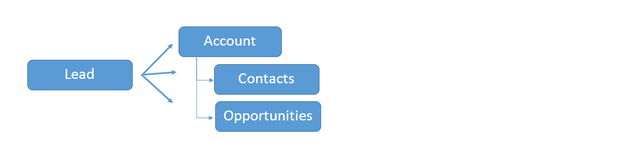
]]>Microsoft Dynamics 365 is designed to support the sales process from acquiring a new lead through the close of a sale. CRM has a place to store the contact information for new leads, a place to track the follow-up communications (such as Phone Calls, Emails, and Appointments), and the ability to qualify a Lead into an Account, Contact, and Opportunity.
CRM keeps Leads in a separate area (essentially quarantined) in order to ensure your main database of Accounts and Contacts does not get cluttered with people your organization doesn’t know.
As part of the Opportunity, you may create a Quote in CRM and convert that to an Order and an invoice. CRM’s Product Catalog provides the basis for this process. Organizations using this functionality often have an integration with their financial software or Enterprise Resource Planning (ERP) software. In this way the product catalog and pricing has a single source, is kept up-to-date, and the complexities of ordering and invoicing are handled appropriately.
Below represents a typical integration between CRM and ERP.
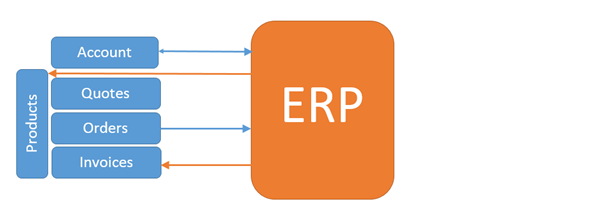
The end of a typical sales process is the close of the Opportunity as Won or lost. If the opportunity is Won, the Relationship Type on the Account is often changed from Prospect to Customer.
Configuring Microsoft Dynamics 365 Sales Process
Every organization that implements CRM for sales must spend a little time analyzing their unique processes and configuring CRM to reflect that. This might mean just changing a few fields or it might mean significantly modifying the forms and view, deciding to add new record types, and/or deciding to disable unused features.
For example, out-of-the-box CRM most closely supports a Business-to-Business (B2B) sales process with a longer sales cycle. If that describes your organization, you will have an easier time using CRM out-of-the-box with only minor business process analysis and configuration.
Other organizations that might be Business-to-Consumer (B2C) or have a shorter sales cycle should analyze their process and consider what customization may be needed. Therefore, each organization must carefully evaluate their own sales process to determine how much CRM can be used out-of the-box.
Understanding Leads
A lead represents any person or organization that a company might have the potential to do business with. Microsoft Dynamics 365 is used to store data about that lead. In fact, creating a Lead record of information about a new lead is often the first step users take in the sales process. For instance, if your company receives an inquiry on your website contact form about your product offerings, you would use a Dynamics 365 lead record to collect and store information about that person or business.
TIP! Not every organization will use leads. For help on determining whether your organization should use leads, refer to the section on Should You Use Leads?
Elements of a Lead
The lead record contains basic data such as the organization name, contact information, or how a lead was generated (often called the Lead Source). Organizations often customize the lead record to collect data relevant to their sales process.
Working with Leads in Dynamics CRM
Creating Leads
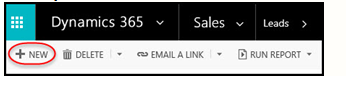
1. In your Lead View, click New. This will bring up a new Lead record where you can enter data manually.
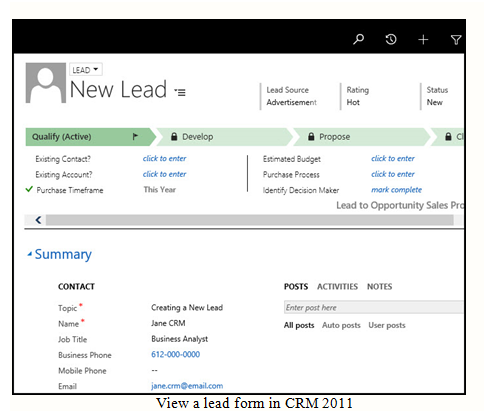
2. Fill out required data such as Topic and Name, as well as any additional data you may have. Contact information is particularly important for following up and qualifying leads.
Tip! Sometimes leads are entered into Dynamics CRM by more than one user, creating duplicate records. Learn more about duplicate detection and removing duplicate records from the system.
Assigning Leads
You can assign leads a couple of ways. One would be to auto-assign leads from workflows. But you can also assign individual leads manually.
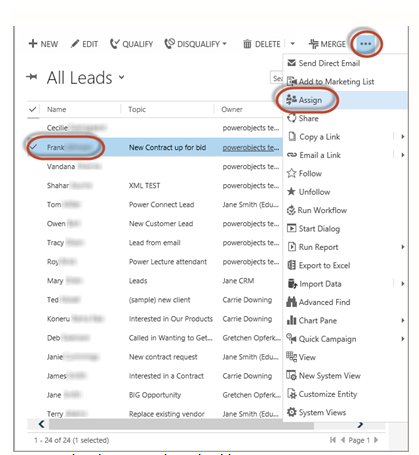
To assign a lead or several leads to an individual, open your Lead View and select the leads you want to assign. Select the Ellipses in the command bar and click the Assign button in the drop down.
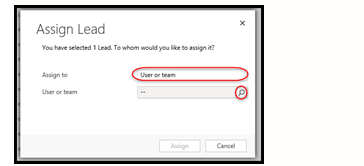
This will open a dialog box. The Assign to field will default to the Me option, but clicking on that field will change it to the User or Team option, and you can use the look-up to search for any user or team you wish to assign it to.
Adding Activities to Leads
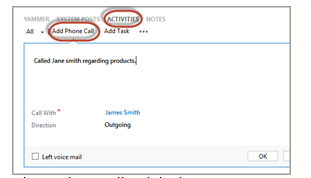
To add an activity to a lead, open a Lead record, navigate to Activities and choose which Activity you would like to add for that lead. Common activities are Tasks, Phone Calls, E-mails, Appointments, and Booking Alert.
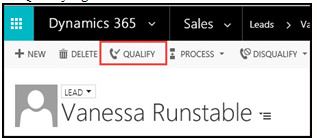
Qualifying Leads in Dynamics CRM
When you Qualify a lead, you determine whether or not that lead is a good candidate for doing business with. At that point, the lead will be converted into a Contact, Account, or Opportunityor a combination of these three record types. If you determine that they are not good candidates for any of these actions, you will Disqualify the lead, which means that they are not currently a good candidate to do business with.
To qualify a lead: 1. In your Lead view, open the Lead record and you can either Qualify or Disqualify the lead in the command
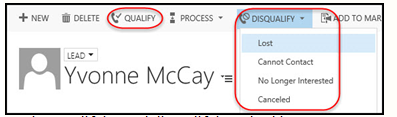
2. If you qualify the record, you convert the lead into either an Account, Contact, or Opportunity record, or a combination of those record types.
- If you Qualify a record, the original lead record is deactivated.
- If you Disqualify a record, you’ll have the option of entering a reason why it is disqualified – Lost, Cannot Contact, No Longer Interested, or Canceled. Then the lead record will be deactivated and you will not find it in your list of active leads.
Tip! Every organization will have its own criteria for determining whether or not a lead is qualified. It is important to have all Dynamics 365 users be consistent with the criteria
Working with Opportunities
- Creating new Opportunities
- Working with the Process-Based Form
- Automating and Analyzing the Sales Process
- Closing Opportunities
Creating New Opportunities
A. From the command bar in the Opportunities section

View creating a new opportunity in CRM 2011
B. Converting a tracked email from Outlook
1. In email, click on Track in the ribbon. Doing this will activate the Convert To button.
2. Click on Convert To > Opportunity
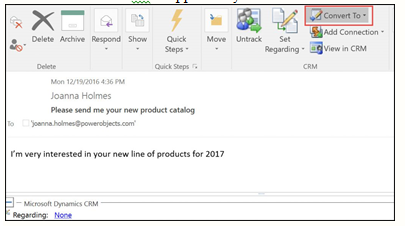
3. Click on the customer look up and select the appropriate customer.
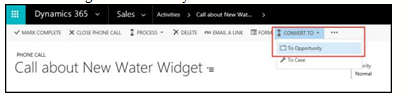
4. Complete filling out the opportunity as usual.C. Converting a CRM activity
D. Qualifying a Lead
E. Converting campaign responses
1. In the top navigation of a campaign response record, click the Convert Campaign Response button. A new window will open.
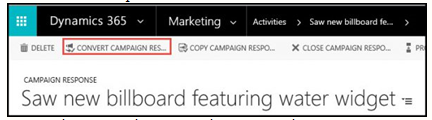
2. Select the “Create a quote, order, or opportunity for an account or contact” radio button.
3. Look up the account, select the opportunity option, and set a currency.
4. Click Ok.
Creating opportunities with user-provided revenue:
- Navigate to the Opportunities view.
- Click on New in the command bar.
- Topic: Enter a short description.
- Potential Customer: You choose a contact or an account. If you do B2B, your potential customer will be an account. If you do B2C, it will be a contact.
- Revenue: Under the Product Line Items section of the form, choosing User Provided will allow you to manually enter Estimated Revenue. Choosing System Calculated requires the use of the product catalog.
- Estimated Revenue: This field feeds the sales pipeline. Once an opportunity is won or lost, users can enter Actual Revenue.
- Owner: This defaults to the user creating the opportunity. Typically the owner is the sales person who is responsible for closing the sales
Working with the Process-Based Form
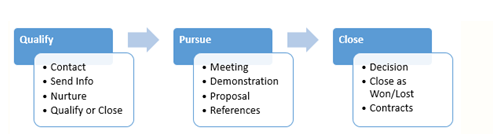
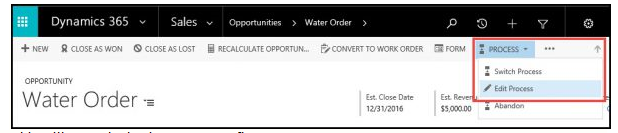
The release for CRM 2011 introduced a new user interface with process-based forms for accounts, contacts, leads opportunities and cases and is also known as a Business Process Flow. In Dynamics 365, there are several pre-configured business process flows which you can use as they are, or edit them to suit your unique business needs. You can even have multiple processes and switch between them if you have business scenarios that call for a different process to be followed by simply clicking the Process button on the command bar.
With business process flows organizations can guide sales users through a process and stages. The Lead and Opportunity have been combined onto one form and one process. The first stage is when the record is the lead and you can convert the lead to an opportunity by proceeding to the next stage.
Note: when you qualified a lead in a previous versions a window would pop open allowing you to select whether to create an opportunity, account and/or contact. This window no longer exists.
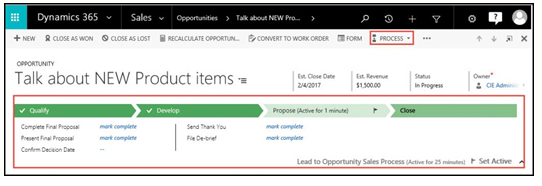
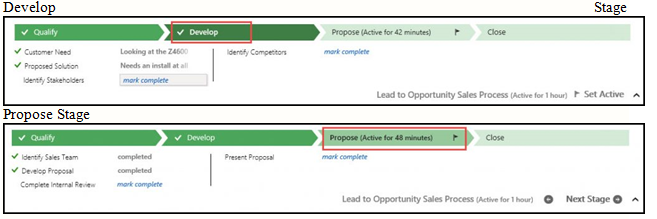
As you move to the next sales stage the fields that are right below the stages change. These can be customized. Notice that the fields change when you move the opportunity from the Develop to Propose stage. You can tell which stage the opportunity is currently at by the flag icon on the active stage.Develop Stage
Customize the Process Form:
- Open the entity form that you want to customize.
- Select Process on the command bar. Choose Edit Process.
This will open the business process flow.
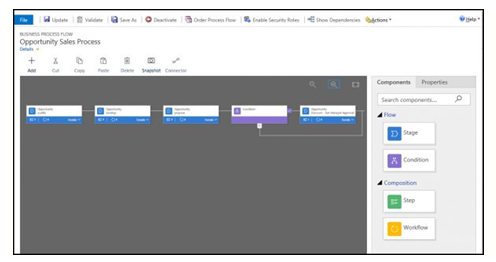
- From here you can drag components at right to modify the process, add steps to existing stages, insert conditions, and add workflows to either specific stages of the process, or set them as a Global Workflow item if you want to trigger a workflow based on the start of a process, or completion of a process. It’s important to note the workflow component must be based on the same primary entity as the process.
- You can also enable security roles for specific processes. For example, maybe your service reps can read the Opportunity process but can’t make any changes.
- Once you’ve completed your edits, click Update, and your new edits to the existing process will be available.
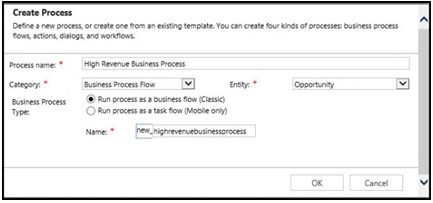
To create a brand new process navigate to Settings > Processes and click the New button in the command bar. This will open the Create Process dialog box. Give the new process a name, set the Category to Business Process Flow, and in the Entity list select the entity you are creating the process for.
Automating and Analyzing Sales Processes
Many organizations use workflow to help automate their sales process. If used correctly, automation offers the following benefits:
- Reduce data entry for sales team
- Ensure sales team follows consistent sales processes and protocol
- Alerts
- Inform management of important opportunities
- Procurement of possible inventory strain
- Sales Executive of nearing estimated close date
- Escalation based on neglected opportunities
- Activity Creation
- Activities based on stage or other parameters (Estimated Revenue)
- Activity completion advances sales stages
- Update customer records based on Opportunity
Analyzing the Sales Process
Dynamics 365 offers a number of ways for sales teams to analyze their sales data. With the exception of Custom Reports created in SQL Server Reporting Services (SSRS), power users can build the rest once they have insight into their data and how to accomplish this in Dynamics 365.
Options for analyzing data:
- Charts
- Dashboards
- Views
- Goals
- Excel
- Report Wizard reports
- Out of box reports
- Custom reports (SSRS)
Company leadership can use reports and dashboards to gain oversight into:
- When revenue will hit
- What opportunities have been neglected
- What industries/verticals have potential
- How individual sales executives are doing
- When they need to ramp up staffing
- How close you are to organizational goals
Closing Opportunities
Effective management of opportunities requires users close opportunities upon win or loss. When an opportunity is won or lost users are prompted to enter Actual Revenue and Actual Close Date. The competitor who won the opportunity can be entered when an opportunity is lost. Once it is won or lost it is marked as complete and cannot be modified. However, opportunities can be reopened if necessary. The Actual Revenue is reflected in many reports and charts throughout Dynamics 365.
Closing an Opportunity can be done from the Opportunity view or from within the Opportunity record.
From the Opportunity view:
- Select the Opportunity in the view
- Click on Close as Won or Close as Lost in the command bar.
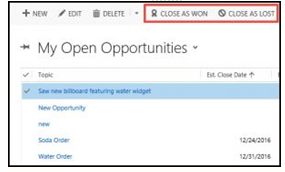
From within the Opportunity record:
- Open the Opportunity record
- Click on Close as Won or Close as Lost in the command bar. This generates the Close Opportunity dialog where users enter the Actual Close Date (this defaults to the current date), Actual Revenue (this defaults to the Estimated Revenue for won opportunities and as zero for lost opportunities), and Competitor (this is only for lost opportunities and indicates who won it)
- Click OK
The post MS CRM for Sales appeared first on Dynamics.
]]>The post Microsoft Dynamics CRM Navigation appeared first on Dynamics.
]]>Navigation bar in Microsoft Dynamics CRM is located on top of screen in windows 8 style and easy to navigate in other devices like mobile, tablets.
Explore Microsoft Dynamics CRM Navigation
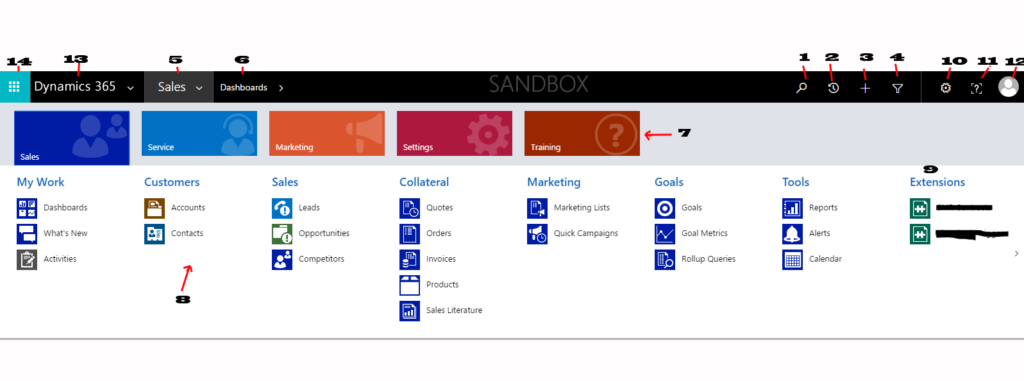
- Global Search – Microsoft dynamics CRM navigation facilitates with global search to take advantage of quick search globally over all search enable entities and attributes. Some default entities are already enabled for global search, in case of custom entities or attributes we need to allow them for search result.
- Recent Viewed Items – As per name it uses to provide quick access of recently viewed items or views without a going throw a proper navigation flow.
- Plus or New – This is very unique and special menu item provided in Microsoft dynamics CRM navigation to quick create records in CRM without going throw a standard navigation flow. Like global search, It’s also not by default allowed for all entities, we need to enable custom entities for quick create and customize quick create forms accordingly.
- Advance find – This is use to filter records or create special or personal view or generate fetch xml. Microsoft Dynamics CRM Advance find is very useful for generating relative data or analyzing data based on different criteria. It facilitates user to add or edit columns add group by, search in lookups and manipulate data view.
- Main Menu – Microsoft dynamics 365 is slightly different from on premises and main menu uses to select top menu items to navigate sub menu items. Usually we can find Sale, Service, Marketing, Settings, Help as top level and corresponding sub menu items under top one. We can also add custom top menu items and sub menu items by customize sitemap in Microsoft dynamics CRM.
- Sub Menu Item – Submenu items use to display selected sub menu items under top Microsoft Dynamics Navigation Menu Item.
- Dropdown Menu – Dropdown menu items allow user to select submenu items and navigate throw lower level in Navigation flow of Microsoft Dynamics CRM Navigation.
- Sub Menu Area Items – Sub-sub menu items are grouped by area and easy to find by sub menu selection.
- Extensions – Extensions are used to show all custom entities added in group area of Microsoft Dynamics CRM Navigation. In case you don’t have any custom entities added in a group area it will not be visible. It by default takes all custom entities in under extension menu. If you don’t want to add custom entity under extension menu item, don’t select area at time of entity creation.
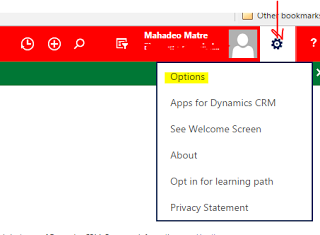
- Gear Box – As per symbolic uses of gear boxes in frontend, uses to do personal level setting in Microsoft Dynamics CRM. It has one of import feature options to do general settings, synchronize setting, activities, email templates, format, email settings which are very useful in for CRM performance as well as marketing stuffs.
- Help – This menu item use to provide quick help for basic setup and guide for user.
- User info- Microsoft Dynamics CRM user info uses to show logged user information, associated organization, logout action and changes image facility.
- Dynamics CRM Home – this is home menu items in dynamics CRM to navigation on home page and search for apps or to check all installed app in Microsoft Dynamics CRM instance.
- Global Navigation – Global navigation uses to navigation to others app in Microsoft Dynamics Cloud like office 365, SharePoint, Power BI, Power APP, One drive etc.
Navigation bar in earlier version of dynamics CRM forces user to scroll to find more items, in latest versions after Microsoft Dynamics CRM 2016, it has facility to include more icons and auto scroll as you move cursor towards right or left which makes easy navigation flow.
Due to it responsive layout users can use CRM in mobile view as well as tablet view and it does change navigation view as per targeted device.
The post Microsoft Dynamics CRM Navigation appeared first on Dynamics.
]]>